
How to Install Bus Bars in Electrical Panels: A Step-by-Step Guide
Bus bars play a crucial role in electrical distribution systems by providing a reliable and efficient way to conduct electricity within electrical panels. Whether in industrial, commercial, or residential applications, bus bars in electrical panels enhance power distribution, reduce wiring complexity, and improve safety. Proper installation is essential to ensure optimal performance and compliance with electrical codes.
In this comprehensive guide, we’ll walk you through the process of installing bus bars in electrical panels, covering safety precautions, tools required, installation steps, and best practices.

Understanding Bus Bars in Electrical Panels
Before diving into the installation process, let’s first understand what bus bars are and why they are essential in electrical systems.
What Are Bus Bars?
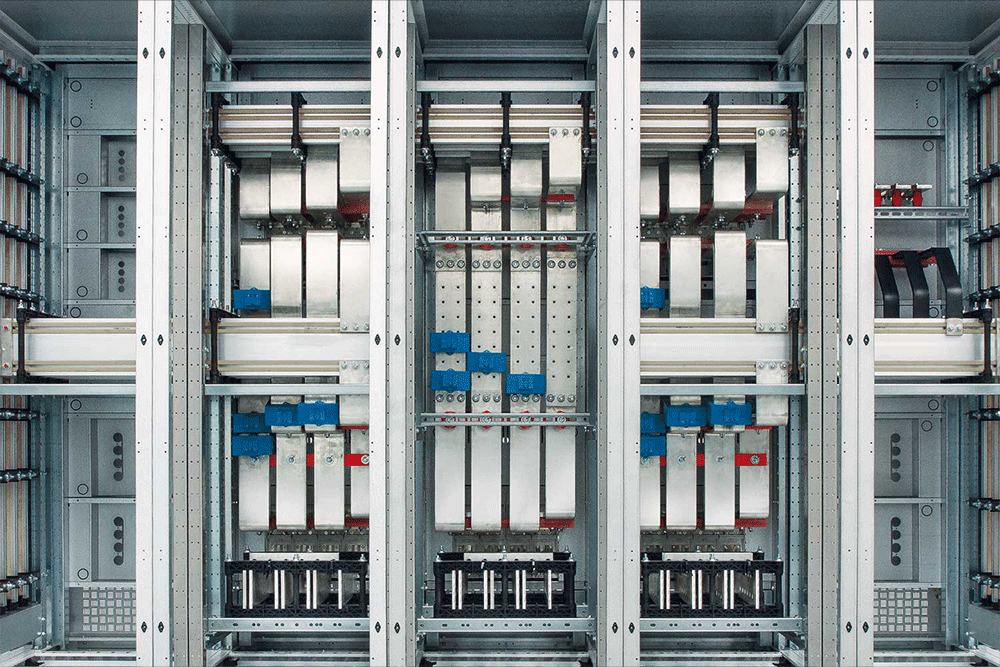
Bus bars are metallic strips or bars, typically made of copper or aluminum, used to conduct and distribute electrical power within a panel or switchgear. They serve as a central connection point for multiple electrical circuits, allowing efficient power distribution while minimizing the need for excessive wiring.
Advantages of Using Bus Bars in Electrical Systems
1.Improved Conductivity–Copper and aluminum bus bars offer excellent conductivity, reducing energy loss.
2.Space Efficiency–They help organize electrical panels, making them compact and easier to maintain.
3.Reduced Electrical Resistance–Compared to traditional wire connections, bus bars have lower resistance, reducing heat buildup.
4.Enhanced Safety–Bus bars minimize loose wire connections, lowering the risk of electrical faults and fires.
5.Ease of Maintenance–With a structured layout, it’s easier to troubleshoot and replace faulty components.
Now that we understand their importance, let’s move on to the installation process.
Safety Precautions Before Installation
Working with electrical panels requires strict adherence to safety measures to prevent shocks, short circuits, or fire hazards. Follow these safety guidelines before installing bus bars in electrical systems:
- Turn Off Power–Always shut off the main power supply before working on an electrical panel. Use a voltage tester to confirm that no current is flowing.
- Wear Personal Protective Equipment (PPE)–Insulated gloves, safety goggles, and flame-resistant clothing are recommended.
- Use Insulated Tools–Ensure that all tools used for installation are properly insulated to prevent accidental shocks.
- Follow Electrical Codes–Compliance with NEC (National Electrical Code) or local regulations is mandatory to ensure safety and functionality.
- Avoid Overloading the Bus Bar–Each bus bar has a specific current rating. Exceeding its capacity can lead to overheating and failure.
Once safety precautions are in place, gather the necessary tools and materials.
Tools and Materials Required
Before starting, ensure you have the following tools and materials:
Tools:
- Insulated screwdrivers
- Voltage tester or multimeter
- Torque wrench
- Wire stripper and cutter
- Electric drill (if mounting new bus bars)
- Insulated socket wrenches
Materials:
- Copper or aluminum bus bars
- Insulation covers (if required)
- Mounting brackets
- Screws and bolts
- Conductive grease (for aluminum bus bars)
- Electrical tape or heat shrink tubing
Now that you have everything ready, let’s move on to the installation process.
Step-by-Step Guide to Installing Bus Bars in Electrical Panels
Step 1: Choose the Right Bus Bar for Your Application
Selecting the correct bus bar is critical. Consider the following factors:
- Material: Copper bus bars offer superior conductivity, while aluminum is a cost-effective alternative.
- Current Rating: Ensure the bus bar can handle the expected electrical load.
- Size and Shape: Flat, solid, or laminated bus bars may be chosen based on space and efficiency needs.
- Insulation Requirements: Depending on the installation, insulated or bare bus bars may be required.
Step 2: Turn Off the Power and Verify
- Locate the main breaker and switch it off.
- Use a voltage tester to confirm that no power is running through the panel.
Step 3: Plan the Bus Bar Layout
- Identify the optimal placement within the electrical panel for efficient power distribution.
- Ensure proper clearance from live components to prevent accidental contact.
- Use a panel diagram to visualize the layout before mounting.
Step 4: Secure the Bus Bar in Place
- Use mounting brackets and screws to attach the bus bar to the panel.
- Ensure that the bus bar is firmly secured to prevent movement and electrical hazards.
- If using an aluminum bus bar, apply conductive grease to prevent oxidation and improve conductivity.
Step 5: Connect the Electrical Wires
- Strip the insulation off the incoming feeder cables and secure them to the bus bar using bolts or clamps.
- Follow proper torque specifications to ensure tight and secure connections.
- Use color-coded wires or labels to differentiate between neutral, ground, and phase connections.
Step 6: Insulate and Protect the Bus Bar
- If required, install insulation covers over the bus bars to prevent accidental contact.
- Use heat shrink tubing or electrical tape for additional protection at connection points.
Step 7: Test the Installation
- Double-check all connections for tightness and compliance with electrical standards.
- Use a multimeter to test for continuity and proper voltage distribution.
- Ensure that there are no loose connections that could lead to arcing or overheating.
Step 8: Restore Power and Perform Final Checks
- Turn on the main breaker and monitor the panel for any unusual signs such as sparks, heat buildup, or voltage fluctuations.
- Use an infrared thermometer to check for overheating points in the bus bar connections.
If everything is functioning correctly, the installation is complete!

Best Practices for Long-Term Bus Bar Maintenance
To ensure the longevity and safety of bus bars in electrical panels, follow these maintenance tips:
Regular Inspections
Check for signs of wear, corrosion, or overheating.
Tighten loose connections as needed.
Clean the Bus Bars
Remove dust, dirt, or oxidation using a non-abrasive cleaning solution.
For aluminum bus bars, reapply conductive grease periodically.
Monitor Load Capacity
Avoid overloading the bus bar to prevent overheating and premature failure.
Use an amp meter to verify that the bus bar is within its rated capacity.
Ensure Proper Insulation
Replace worn-out insulation covers to prevent electrical hazards.
Inspect for any exposed connections and insulate them accordingly.
Conclusion
Installing bus bars in electrical panels is a crucial step in ensuring efficient power distribution, safety, and ease of maintenance. By following the step-by-step guide outlined above, you can confidently install bus bars while complying with electrical standards.
Bus bars in electrical systems offer numerous benefits, from improved conductivity to space efficiency and reduced wiring complexity. Whether you're upgrading an existing panel or installing a new system, understanding the correct installation and maintenance techniques will enhance reliability and performance.


